Tutorial : Another FlashTunes Application : Part 3
> Main - Part 1 - Part 2 - Part3
In this section, we create a ComboBox to select different feeds for the Another FlashTunes application.
The different feeds are loaded form a XML file. This XML file is tunerss.xml in the tutorial/part3 directory.
If you want to add a new feed, add a line in the XML file with a label and
an URL for the data attribute.
To generate the URL, use the iTunes
Music Store RSS Feed Generator. With this tool, you can create custom
RSS feeds to fit your specific needs.
<?xml version="1.0" encoding="UTF-8" ?>

<items>

  <item label="iTunes 10 New Releases"         data="http://ax.phobos.apple.com.edgesuite.net/WebObjects/MZStore.woa/wpa/MRSS/newreleases/limit=10/rss.xml"          />

   <item label="iTunes 10 Just Added Albums"         data="http://ax.phobos.apple.com.edgesuite.net/WebObjects/MZStore.woa/wpa/MRSS/justadded/limit=10/rss.xml" />

   <item label="iTunes Top 10 Albums"         data="http://ax.phobos.apple.com.edgesuite.net/WebObjects/MZStore.woa/wpa/MRSS/topsongs/limit=10/rss.xml" />

    ...

</items>
Here are the steps:
- Copy the tunerss.xml in your Flash application directory.
- Select Commands > Data Connection Wizard. This launches the wizard
- The dialog box will ask you to specify a data source, select XML from the pop-up menu.
- Enter tunerss.xml in the Document URL field.
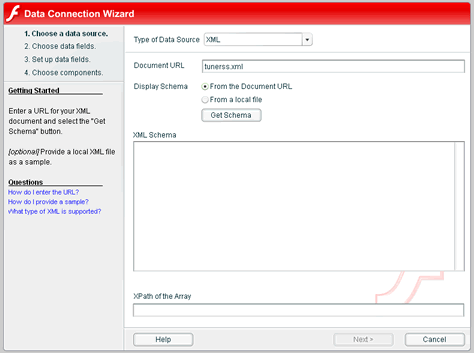
- Select "From the Document URL" and click "Get Schema"
- In the XML Schema, click the Plus (+) button for "items :Object" to expand.
- Select "Item : array" (identified by a red arrow).
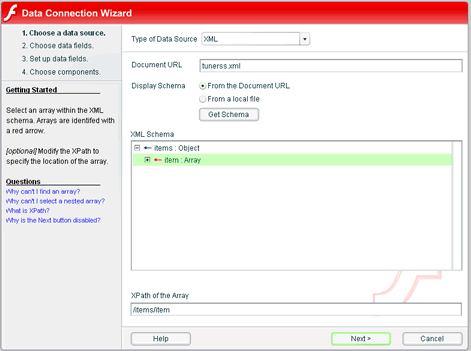
- Press Next.
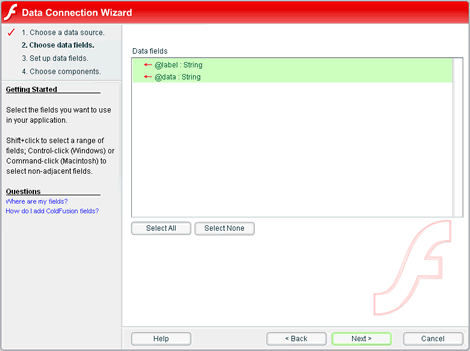
- At this point, you might expect to see a list of data fields available in the results.
- Press Select All and click Next.
- In this wizard step, you can add, update, and remove fields.
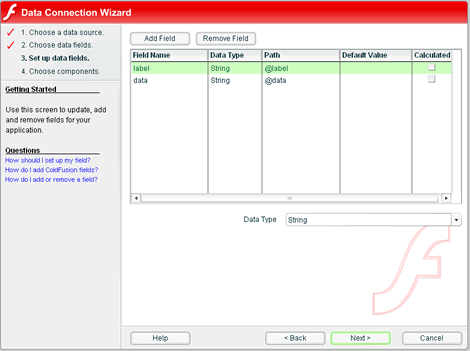
- Click Next to go to the final wizard screen.
- You must name component instances in Flash. Specify rss as the Label for Generated Components. Unselect the two checkboxes.
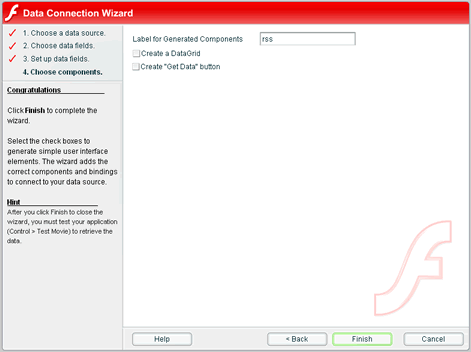
- Click Finish to complete the wizard.
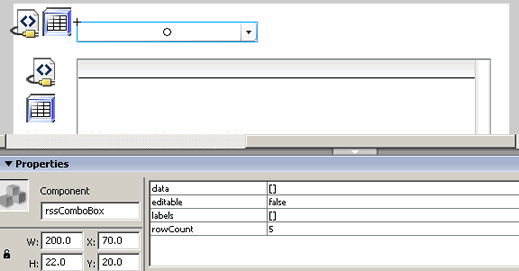
- Drag and drop a ComboBox in the stage. Move it to the position 70x20, resize it to the size 200x22 and name it rssComboBox (with the Properties Inspector).
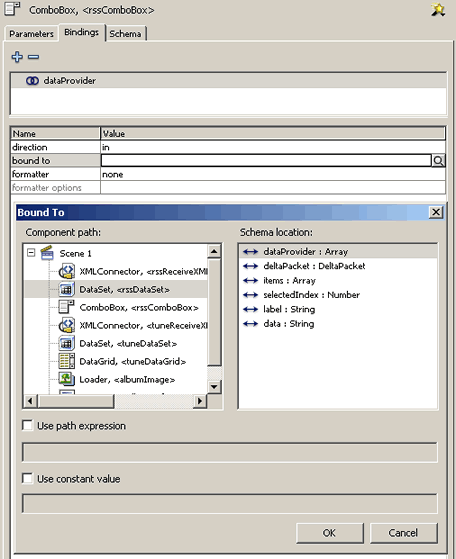
- Open the Component Inspector and choose the Binding tab.
- Click the Plus (+) button to add a new data binding.
- Select the "dataProvider:Array" in the Add Binding Dialog and press OK.
- Select the bound to property and press the magnifying glass tool button. In the Bound To dialogue, set the following:
- Component path: DataSet, <rssDataSet>
- Schema location: dataProvider : Arrayand press OK
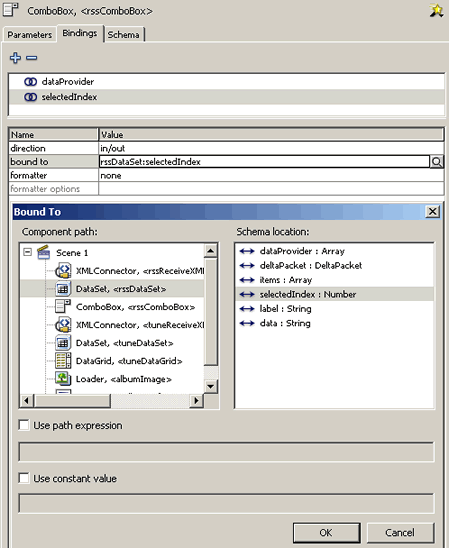
- Click the Plus (+) button to add a new data binding.
- Select the "selectedIndex : Number " in the Add Binding Dialog and press OK.
- Select the bound to property and press the magnifying glass tool button. In the Bound To dialogue, set the following:
- Component path: DataSet, <rssDataSet>
- Schema location: selectedIndex : Numberand press OK
- Select the keyFrame 1 in Actions Layer and open the Actions panel (F9 or select Window > Developments panels > Actions) .
- Replace the following code:
tuneReceiveXMLConnector.trigger();
by
rssReceiveXMLConnector.trigger();
- Save your changes with File > Save (or Ctrl-S) and test the application (Ctrl-Enter) .
To display the Tune rss in the tuneDataGrid, we use a changeListener on the rssComboBox.
- Enter the following code (before the previous code):
// ----- -----

  var rsscbChangeListener = new Object();

  rsscbChangeListener.change = function(eventObj) {

  var target = eventObj.target;

  var owner = target.owner;

  owner.tuneReceiveXMLConnector.URL = target.selectedItem.data;

  owner.tuneReceiveXMLConnector.trigger();

}

rssComboBox.addEventListener("change", rsscbChangeListener);

rssComboBox.owner = this;
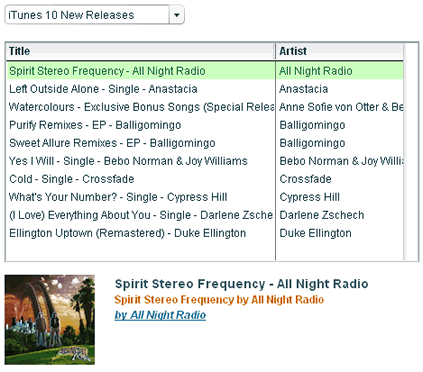
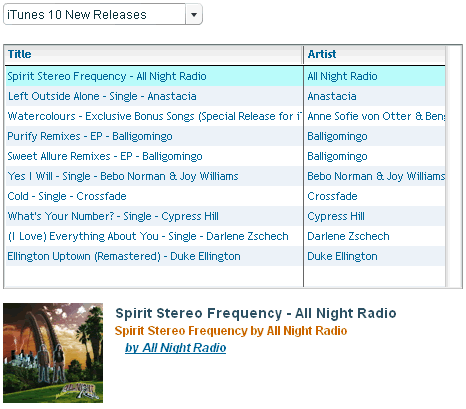
- Save your changes and test the application. If you select a rss in the ComboBox, the tuneDataGrid shows the albums for the rss.
But, we have a problem when the application starts. The tuneDataGrid don't show albums. To correct it, we use an afterLoaded listener for the rssDataSet.
- Enter the following code (before the previous code):
// ----- -----

  var rssdsAfterLoadedListener = new Object();

  rssdsAfterLoadedListener.afterLoaded = function(eventObj) {

  var target = eventObj.target;

  var owner = target.owner;

  owner.rssComboBox.selectedIndex = 0;

  owner.rssComboBox.dispatchEvent({type:"change"});

}

rssDataSet.addEventListener("afterLoaded", rssdsAfterLoadedListener);

rssDataSet.owner = this;
Warning: To force a change, we use : owner.rssComboBox.dispatchEvent({type:"change"}).
This is a hack for the first time. The property selectedIndex usually
works and propagates a change event.
- Save your changes and test the application.
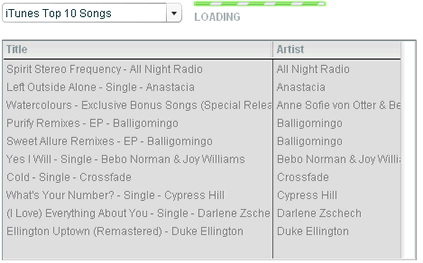
Now , we add a ProgressBar component when the tune rss feed is loading.
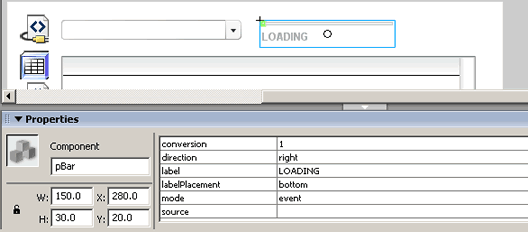
- Select the "Layer 1" layer and drag and drop a ProgressBar component. Move it to the position 280x20 and name it pBar (with the Properties Inspector).
- Select the keyFrame 1 in Actions Layer and open the Actions panel (F9 or select Window > Developments panels > Actions) .
- Enter the following code (before the previous code):
// ----- ------ Modify the rsscbChangeListener to show the ProgressBar component.
For this, add the following code (at the end of rsscbChangeListener code):
function enableProgress(enabled, label) {
if (label == undefined) {
label = "";
}
pBar.indeterminate = enabled;
pBar.label = label;
pBar.enabled = enabled;
pBar._visible = enabled;
tuneDataGrid.enabled = !enabled;
albumInfo._visible = !enabled;
albumImage._visible = !enabled;
}
enableProgress(true, "LOADING");
- The new code for the rsscbChangeListener is:
  rsscbChangeListener.change = function(eventObj) {

  var target = eventObj.target;

  var owner = target.owner;

  owner.tuneReceiveXMLConnector.URL = target.selectedItem.data;

  owner.tuneReceiveXMLConnector.trigger();


  enableProgress(true, "LOADING");

}
- Modify the tunedsAfterLoadedListener to hide the ProgressBar
component. For this, add the following code (at the end of tunedsAfterLoadedListener
code):
enableProgress(false, "");
- The new code for the tunedsAfterLoadedListener is:
 tunedsAfterLoadedListener.afterLoaded = function(eventObj) {

  var target = eventObj.target;

  var owner = target.dgowner;

  owner.tuneDataGrid.selectedIndex = 0;

  owner.tuneDataGrid.dispatchEvent({type:"change"});

  enableProgress(false, "");

};
- Save your changes and test the application.
Now, the final touch.
- Modifiy the tuneDataGrid style and other components for a better look. Insert the following code :
// ----- -----

tuneDataGrid.setStyle("fontFamily", "Trebuchet MS");

tuneDataGrid.setStyle("fontSize", "11");


tuneDataGrid.setStyle("textRollOverColor", 0x006699);

tuneDataGrid.setStyle("textSelectedColor", 0x006699);

tuneDataGrid.setStyle("color", 0x006699);


tuneDataGrid.setStyle("alternatingRowColors", Array(0xFFFFFF, 0xECF2F8));


tuneDataGrid.setStyle("themeColor", "haloBlue");

rssComboBox.setStyle("themeColor", "haloBlue");

pBar.setStyle("themeColor", "haloBlue");
- Save your changes and test the application.
That's all. C'est fini...
The final application tune .fla is in the directory: tutorial/final.