Tutorial : Another FlashTunes Application : Part 1
> Main - Part 1 - Part 2 - Part 3
The Another FlashTunes Application is based on the newly released iTunes web service from Apple Computer. The web service lists recently added songs, new releases, iTunes top songs, iTunes top albums.
Here are the steps to build the Another FlashTunes Application with the Data Connection Wizard and the DataGrid Column Editor extensions. You can download the Data Connection Wizard and DataGrid Column Editor extensions from Macromedia Exchange.
Flash 8 and Data Connection Wizard : If the following error occur "While executing in MyFileName.fla, a JavaScript error occurred.", see this article : http://www.macromedia.com/go/60b46608
- Start Flash MX Professional 2004. Create a Flash Application by selecting File > New > Flash Document.
- Change the size to 550x500 pixels with the Properties inspector.

- Save the file as tune.fla
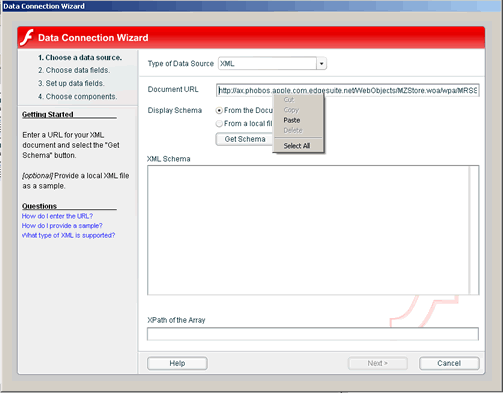
- Select Commands > Data Connection Wizard. This launches the wizard
- The dialog box will ask you to specify a data source, select XML from the pop-up menu.
- Copy the following URL and paste it in the Document URL field.
http://ax.phobos.apple.com.edgesuite.net/WebObjects/MZStore.woa/wpa/MRSS/newreleases/limit=10/rss.xml
With the iTunes Music Store RSS Feed Generator you can create custom RSS feeds to fit your specific needs.
The previous URL is for feed type : New Releases.
- Select "From the Document URL" and click "Get Schema"
- In the XML Schema, click the Plus (+) button for "rss :Object" to expand, click + for "channel : Object" to expand
- Select "Item : array" (identified by a red arrow)
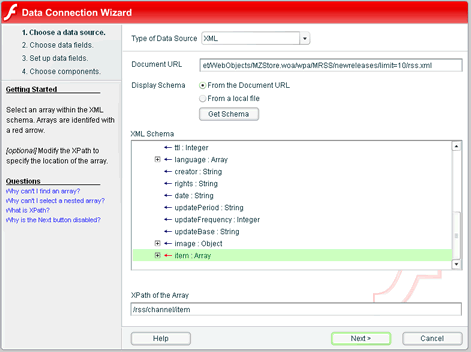
- Click Next
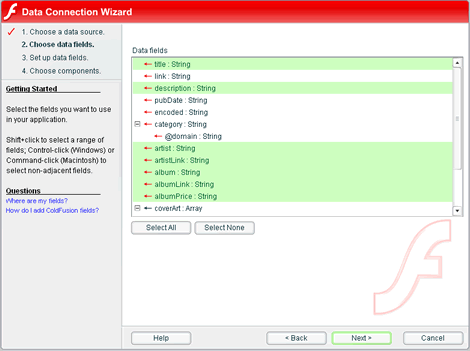
- At this point, you might expect to see a list of data fields available in the results.
- Select title, description, artist, artistLink, album, albumLink and albumPrice and click Next.
- In this wizard step, you can add, update, and remove fields.
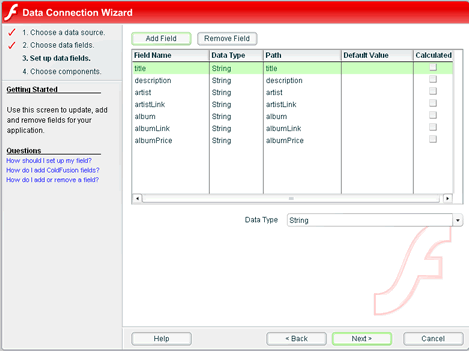
- Click Next to go to the final wizard screen.
- You must name component instances in Flash. Specify tune as the Label for Generated Components. Leave the two checkboxes selected (the first instructs the wizard to create a data grid, and the second embeds a button that a user may click to execute the XML call).
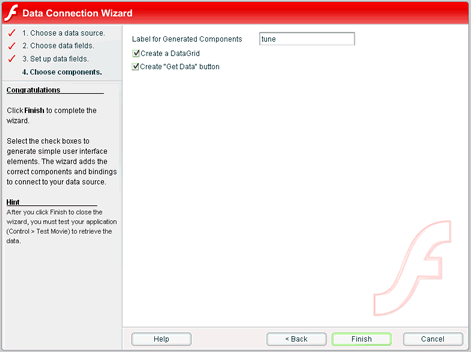
- Click Finish to complete the wizard.
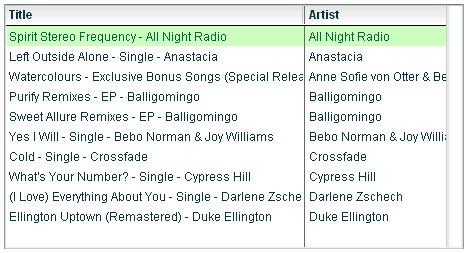
You should now have four components on the Stage: a XMLConnector, a DataSet, a DataGrid, and a Button.
- Select all the components (with Ctrl-A) and move the objects to the position 14x60 ( with the Properties panel).
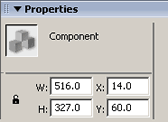
- Change the size of the tuneDataGrid to 460x245 pixels (with the Properties panel).
- Now test the application:
Save your changes with File > Save.
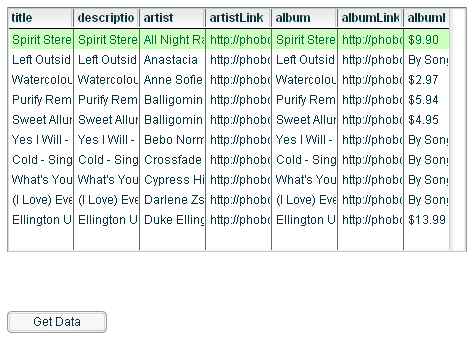
Select Control > Test Movie to launch the application.An empty grid will display. To populate the grid, click the Get Data button; Flash will connect to URL through the XMLConnector, retrieve the data, and use the results to populate the DataSet, which populates the DataGrid.
By default, data grids display all columns in their related data sets; to change this behavior, use the "DataGrid Column Editor" wizard. Follow these steps:
- Select tuneDataGrid.
- If the Component Inspector panel is not open, open it (Alt-F7 or select Window > Developments panels > Component Inspector)
- Click the wizard button (the yellow star icon) on the top right of the panel, and select DataGrid Column Editor to launch the wizard.
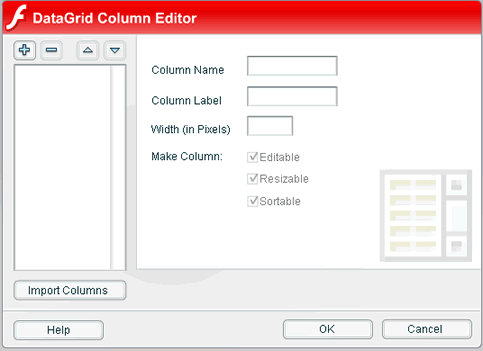
- Click the Import Columns button to import the DataSet columns.
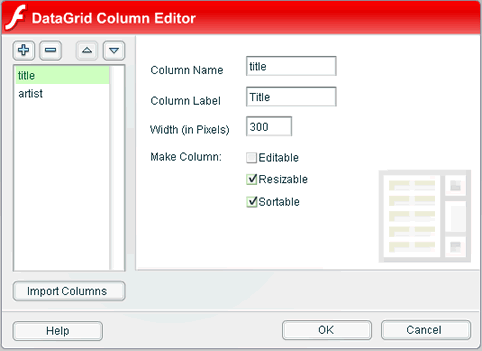
- To prevent description from displaying, select it, and click the Minus (-) button. Repeat the operation for artistLink, album, albumLink and albumPrice.
- Select title. Enter Title for Column Label. Enter 300 for for Width. Unselect Editable.
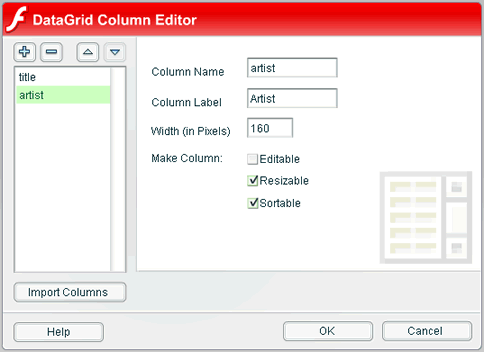
- Select artist. Enter Artist for Column Label. Enter 160 for for Width. Unselect Editable.
The next step is to delete the Get Data button and to write some code to force the grid to populate automatically upon starting. Here are the steps:
- Delete the Get Data button (select it and press Delete on your keyboard).
- Insert a layer (Insert > Timeline > Layer) and rename it Actions.
- Select the keyFrame 1 in Actions Layer and open the Actions panel (F9 or select Window > Developments panels > Actions) .
- Enter the following code:
tuneReceiveXMLConnector.trigger();
- Save your changes with File > Save (or Ctrl-S)
- Select Control > Test Movie (or Ctrl+Enter) to launch the application.