Tutorial : Another FlashTunes Application : Part 2
> Main - Part 1 - Part 2 - Part 3
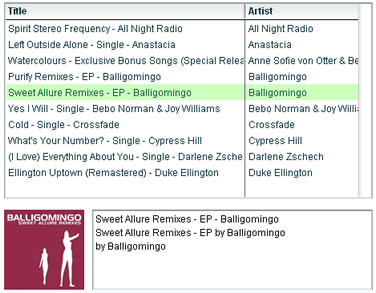
If the user selects an album, the Another FlashTunes Application shows an image and a short description for this album.
If you analyze the XML file generated by the URL, the image for the album is in the covertArt attribute.
<itms:coverArt height="53" width="53">http://a1...1/s02.csbxztmt.53x53-75.jpg</itms:coverArt>

    <itms:coverArt height="60" width="60">http://a1...1/s02.csbxztmt.60x60-75.jpg</itms:coverArt>

    <itms:coverArt height="100" width="100">http://a1..1/s02.csbxztmt.100x100-99.jpg</itms:coverArt>
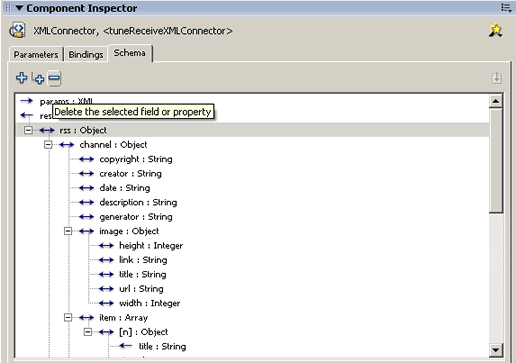
Bad news : the Data Connection Wizard hasn't generated an array and the attributes for the covertArt attribute.
Here are the steps to create the new attribute (for the image) and to show the image for an album.
- Select the tuneReceiveXMLConnector.
- If the Component Inspector panel is not open, open it (Alt-F7 or select Window > Developments panels > Component Inspector). In the Component Inspector, choose the Schema tab
- Select the "rss : Object" and click the Minus (-) button to delete it.
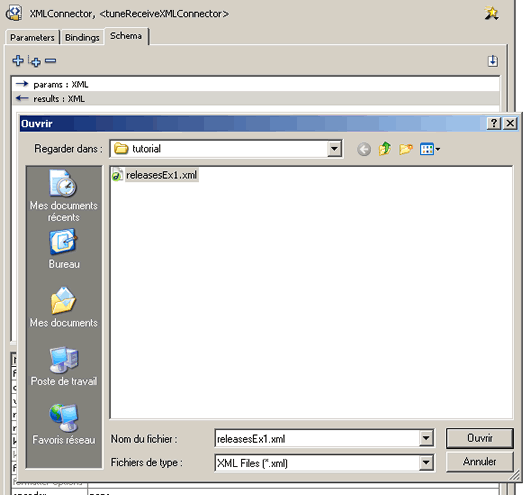
- Select the "results : XML" then click the Import a schema from a sample XML file button on the upper right side of the Schema tab (it looks like a down arrow)
- Browse and select the tutorial/part2/releasesEx1.xml file.
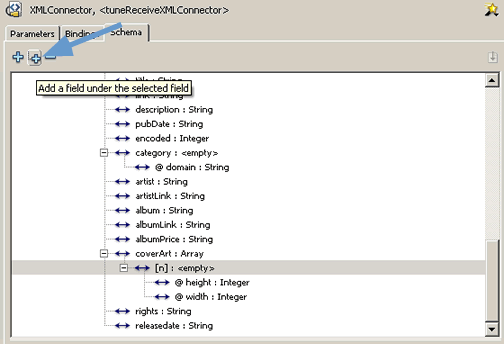
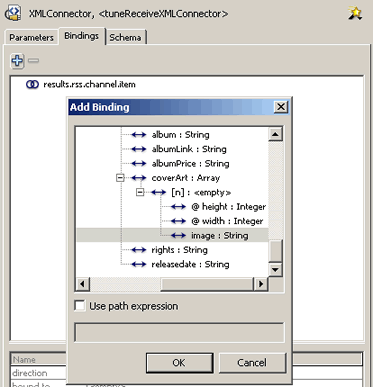
- Search "covertArt : Array"
- Select "[n] : empty" and click the Plus (+) button to add a new attribute.
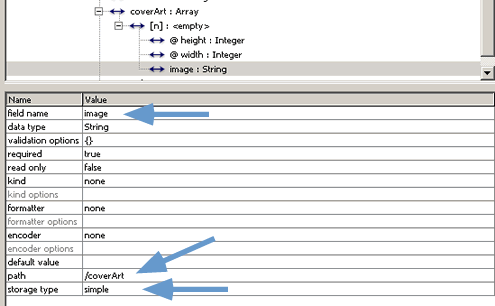
- Enter image for field name, enter /covertArt for path and select simple for storage type.
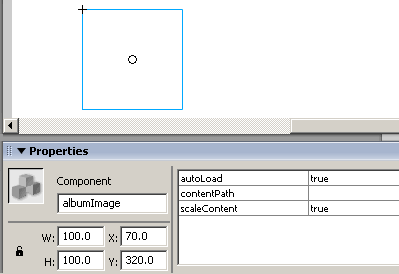
- Drag and drop a Loader component. With the Properties inspector, name it albumImage, set the position to 70x320 and set the size to 100x100.
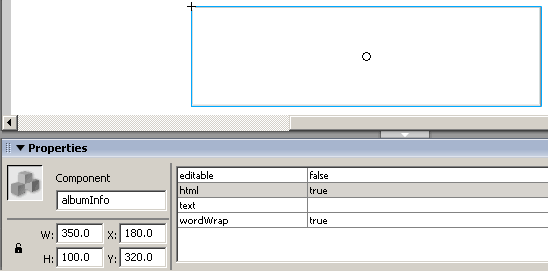
- Drag and drop a TextArea component. With the Properties inspector, name it albumInfo, set the position to 180x320 and set the size to 350x100. Select true for html and false for editable.
- Select tuneReceiveXMLConnector
- Open the Component Inspector panel ans select the Bindings tab.
- Click the Plus (+) button to add a new data binding.
- Select the new attribute (called image:String) in the Add Binding Dialog and press OK.
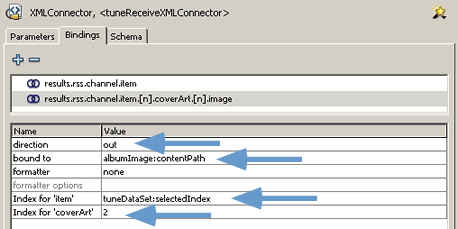
- In the Bindings property grid, below the binding, set the direction property for this binding to out.
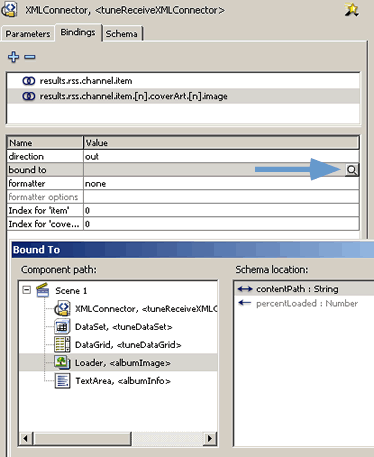
- Select the bound to property and press the magnifying glass tool button. In the Bound To dialogue, set the following:
- Component path: Loader, <albumImage>
- Schema location: contentPath : Stringand press OK
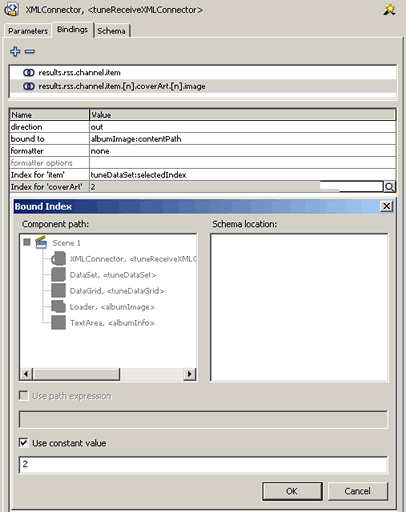
- Select the Index for 'item' property and press the magnifying glass tool button. In the Bound Index dialogue,
- unselect "Use constant value"
- set the following:
- Component path: DataSet, <tuneDataSet>
- Schema location: selectedIndex : Numberand press OK

- Select the Index for 'covertArt' property and press the magnifying glass tool button. In the Bound Index dialogue, enter 2 for Use Constant Value and press OK.
With this binding, we select the third image (with witdh 100 and height 100) in the covertArt Array (see the XML definition at top). If you enter 0, you select the first image (with witdh 53 and height 53).
- Check the Component Inspector for the results.rss.channel.item.[n].covertArt.[n].image binding.
- Save your changes with File > Save (or Ctrl-S)
- Select Control > Test Movie (or Ctrl+Enter) to launch the application.
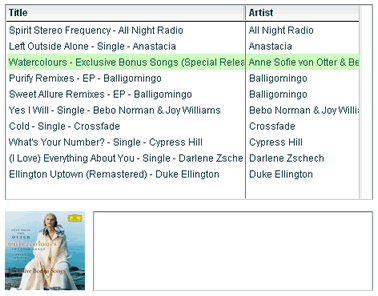
To show a short description for an album, we use a change listener for the tuneDataGrid.
- Select the keyFrame 1 in Actions Layer and open the Actions panel (F9 or select Window > Developments panels > Actions) .
- Enter the following code:
// ----- -----

    var tunedgChangeListener = new Object();

    tunedgChangeListener.change = function(eventObj) {

  var target = eventObj.target;

  var owner = target.dgowner;

  var dataset = owner.tuneDataSet;

  var currentItem = dataset.currentItem;


  var t = "";

  if (currentItem != undefined) {

    t = "<p class='title'>"+currentItem.title+"<p><br>";

    t += "<p class='description'>"+currentItem.description+"<p><br>";

    t += "<p class='artist'><a href='"+currentItem.artistLink+"'>by "+currentItem.artist+"</a><p>";

  }

  owner.albumInfo.text = t;

}

tuneDataGrid.addEventListener("change", tunedgChangeListener);

tuneDataGrid.dgowner = this;
- Save your changes with File > Save (or Ctrl-S) and test the application (Ctrl-Enter)
You
can beautify the album description by adding a Cascading Style Sheet
(CSS) for description.
With a style sheet, you can easily add colors for
the title, for the description and for the artist.
We provide a example of CSS with the tune.css file in the tutorial/part2 directory.
- Copy the tune.css in the directory of your Flash application.
- To add a Cascading Style Sheet, insert the following code in the Action layer (before the previous code):
// ----- -----

var
style_sheet = new TextField.StyleSheet();

style_sheet.load("tune.css");

albumInfo.styleSheet = style_sheet;


albumInfo.setStyle("borderStyle", "none");
- With the line albumInfo.setStyle("borderStyle", "none"), the border of the albumInfo TextArea is removed.
- Test the application
- Insert the following code in the Action layer (before the previous code):
// ----- -----

  var tunedsAfterLoadedListener = new Object();

  tunedsAfterLoadedListener.afterLoaded = function(eventObj) {

  var target = eventObj.target;

  var owner = target.dgowner;

  owner.tuneDataGrid.selectedIndex = 0;

  owner.tuneDataGrid.dispatchEvent({type:"change"});


}

tuneDataSet.addEventListener("afterLoaded", tunedsAfterLoadedListener);

tuneDataSet.dgowner = this;
Warning: To force a change, we use : owner.tuneDataGrid.dispatchEvent({type:"change"}).
This is a hack for the first time. The property selectedIndex usually
works and propagates a change event.